
Diagnostic ability is what separates a parts-changer from a technician. Here’s how to build a systematic approach to diagnosis that gets it right the first time.

What Is Diagnostic Skill and Why Does It Matter?
Technical education teaches you how systems work. Diagnostic skill is knowing what to do when they stop working – and that is a fundamentally different capability. It requires logical thinking, patience, familiarity with service information, and the discipline to follow a process rather than guess.
In the flat rate world, diagnostic ability directly affects your income. A tech who diagnoses accurately on the first attempt gets paid once and moves on. A tech who replaces parts based on guesswork spends unpaid time on comebacks, burns the shop’s money on unnecessary parts, and erodes the customer’s trust. Strong diagnostic skill is one of the highest-value things a technician can develop.
This article covers the foundational diagnostic process used by experienced technicians, the most common mistakes new techs make, and how to build the habit of thinking before reaching for a part.
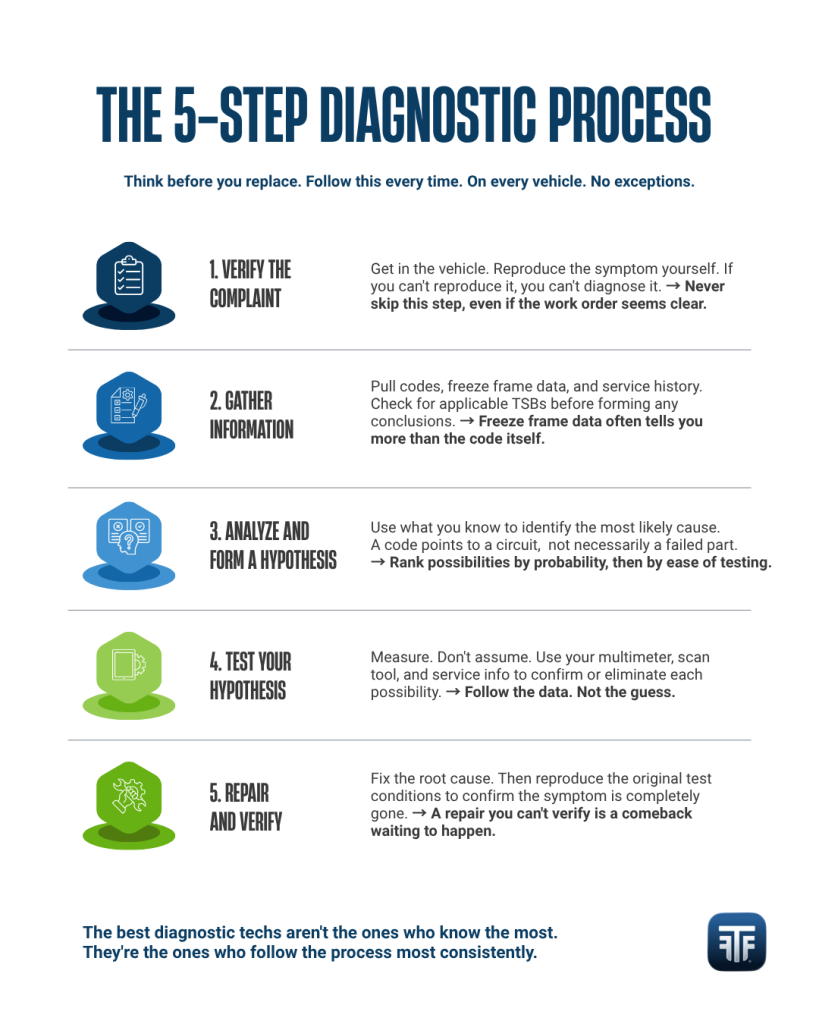
The best diagnostic techs aren’t the ones who know the most. They’re the ones who follow the process most consistently – every time, on every vehicle, no matter how confident they feel going in.
The Diagnostic Process: A Framework That Works
Experienced technicians across every sector of the skilled trades follow some version of this process, whether they call it that or not. Learning it early and applying it consistently is one of the fastest ways to build genuine diagnostic competency.
Step 1: Verify the Complaint
Before touching the vehicle, understand exactly what the customer is experiencing. Read the work order carefully. Ask the service advisor clarifying questions if needed. Then get in the vehicle and try to reproduce the symptom yourself.
A complaint you cannot reproduce is a complaint you cannot diagnose. And a complaint you reproduce under different conditions than the customer described may point to a completely different cause. Never skip this step.
Step 2: Gather Information
Once the complaint is verified, gather information before forming any conclusions. This means pulling codes and freeze frame data with your scan tool, reviewing the vehicle’s service history, checking for any applicable Technical Service Bulletins (TSBs), and noting any relevant symptoms beyond the primary complaint.
Freeze frame data tells you what the vehicle’s operating conditions were when a fault was recorded – engine load, RPM, temperature, fuel trim. This context is often more useful than the code itself in pointing toward the root cause.
Step 3: Analyze and Form a Hypothesis
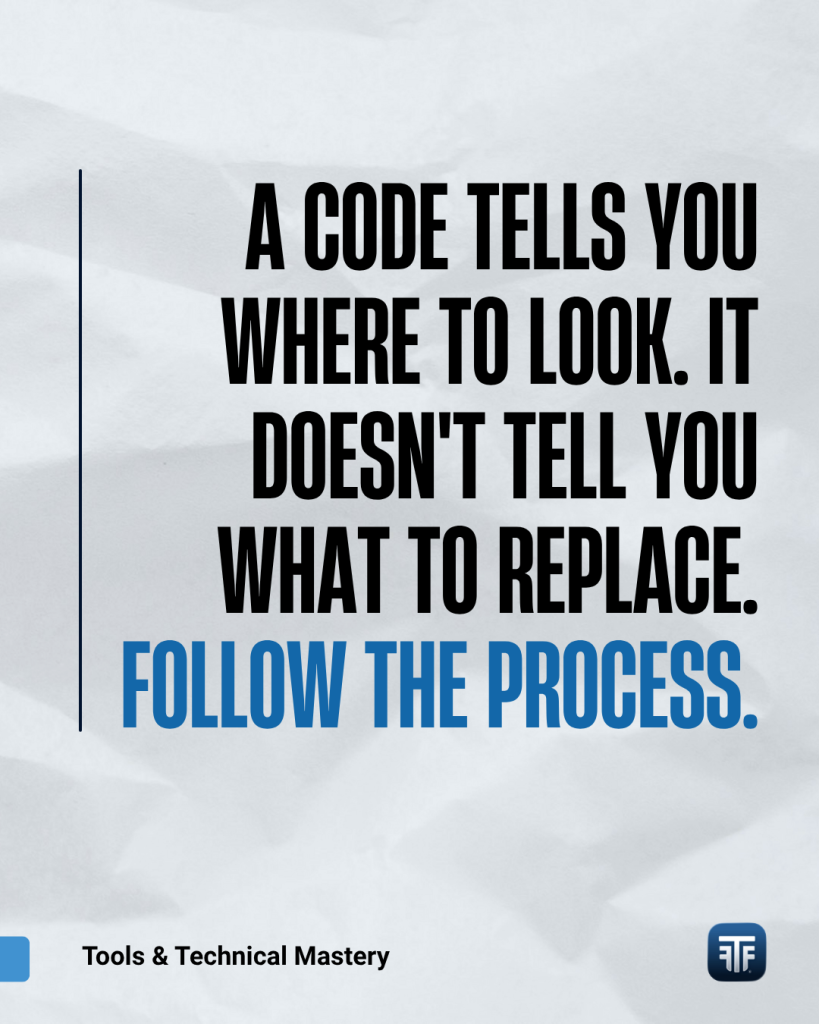
With the information gathered, analyze what you know and identify the most likely cause or causes. This is where knowledge of how systems interact matters. A code points to a circuit or system – not necessarily to a failed component. Ask: what could cause this symptom in this system under these conditions?
Rank your hypotheses by probability and by how easy each one is to test. Start with the most likely and most accessible first.
Step 4: Test Your Hypothesis
Testing means measuring, not assuming. Use your multimeter to verify voltage, ground, and resistance. Use your scan tool’s live data to confirm sensor values against known specifications. Use service information to find the correct test procedure and the correct spec to compare against.
A reading that matches specification eliminates that component. A reading that doesn’t match is your next lead. Follow the data – not the guess.
Step 5: Repair and Verify
Once you’ve confirmed the root cause, perform the repair. Then verify the repair by reproducing the original test conditions and confirming the symptom is gone. Clear codes and perform a drive cycle if needed to confirm no faults return.
Verification is not optional. A repair that cannot be confirmed is a comeback waiting to happen.
The 3 C’s: Concern, Cause, Correction
Most shops use the 3 C’s framework for documenting diagnostic work, and it maps directly onto the process above. Every repair order should tell a complete story using these three elements:
- Concern: What the customer experienced. Written in plain language that reflects the actual complaint. Example: ‘Customer states vehicle hesitates and bucks under light acceleration above 45 mph.’
- Cause: What you found through diagnosis. Specific and supported by test results. Example: ‘Found MAF sensor reading 2.1 g/s at idle against spec of 4.0-6.0 g/s. Confirmed with back-probe voltage test. Sensor contaminated.’
- Correction: What you did to fix it. Parts replaced, procedures performed, torque specs applied. Example: ‘Replaced MAF sensor per OEM procedure. Cleared codes. Road tested 15 miles, no return of symptom or fault codes.’
Clear 3 C’s documentation protects you legally, supports the shop’s warranty claims, and communicates professionally to every person who reads the repair order after you.
The Most Common Diagnostic Mistakes New Techs Make
These five mistakes account for the majority of diagnostic comebacks in shops across every sector. Knowing them in advance is the first step to avoiding them:
| Mistake | What It Looks Like | Real-World Example |
| Parts cannon approach | Replacing parts based on a code without verifying the root cause | A P0420 code (catalyst efficiency) gets a new catalytic converter. The actual cause was an upstream O2 sensor giving false data. The code returns immediately. |
| Skipping the verify step | Starting diagnosis without confirming the customer’s complaint firsthand | Customer says the car stalls at idle. Tech goes straight to code pulling. The actual complaint only occurs when the AC is running – a detail that changes the diagnostic path entirely. |
| Trusting the code, not the system | Assuming a code points directly to the failed component | A misfire code on cylinder 4 leads to a new ignition coil. The actual cause was a leaking fuel injector – same symptom, different system. |
| Skipping service information | Diagnosing from memory instead of verifying specs | A tech sets base idle without checking the OEM spec. The spec is different from what they remembered from a similar vehicle. The complaint returns. |
| Not verifying the repair | Signing off on a job without confirming the original complaint is resolved | A repair is completed, car goes back to the customer, and the original symptom returns the same day because the root cause had a second contributing factor that wasn’t checked. |
Using Service Information Correctly
Service information is the most underused tool in most shops. Every OEM publishes detailed diagnostic procedures, wiring diagrams, component locations, and specification tables for every system on every vehicle they produce. Using it consistently is what separates systematic diagnosis from educated guessing.
- Alldata and Mitchell 1 are the two most common professional service information platforms used in shops. If your shop subscribes to one, learn it thoroughly – not just how to look up a torque spec, but how to navigate wiring diagrams, identify connector locations, and follow a diagnostic tree.
- OEM service portals are available directly from manufacturers for most makes. For complex electrical or powertrain diagnosis, OEM information is often more complete than third-party platforms.
- TSBs (Technical Service Bulletins) are manufacturer-issued notices about known issues and updated repair procedures. Checking for applicable TSBs before diagnosing a complaint can save significant time – many common complaints already have a documented root cause and repair procedure.
Building Diagnostic Skills Over Time
Diagnostic competency is built through deliberate practice, not just exposure. Here’s how to develop it systematically:
- Follow the process on every car, not just the hard ones. The habit of systematic diagnosis needs to be consistent to be reliable. Skipping steps on ‘easy’ jobs trains you to skip steps on hard ones too.
- Study the system before diagnosing the symptom. If you’re weak on fuel system diagnosis, spend time with the service information for a fuel system before a fuel complaint lands on your lift. Proactive learning beats reactive scrambling.
- Debrief your own comebacks honestly. When a repair comes back, resist the instinct to deflect. Walk through where the diagnostic process broke down. That honest review is the fastest path to not repeating the mistake.
- Watch experienced techs work through difficult diagnosis. Ask questions. Observe the process. The diagnostic thinking of a skilled tech is often invisible in the final repair order – but visible when you watch them work in real time.
Diagnostic Tools Worth Understanding
Strong diagnostic skill requires more than a scan tool. Here’s the core equipment a developing diagnostic tech needs to understand:
- Digital Multimeter (DMM): The most fundamental diagnostic tool in any shop. Measures voltage, resistance, and current. Essential for electrical diagnosis. Learn to use it properly before relying on any other diagnostic equipment.
- OBD-II Scan Tool with Live Data: Entry-level code readers are useful but limited. A mid-range scan tool with live data streaming, freeze frame access, and bi-directional controls unlocks a significantly deeper level of diagnosis. TopDon makes strong options at accessible price points.
- Lab Scope (Oscilloscope): The most powerful electrical diagnostic tool available to a tech. Displays voltage signals over time, allowing diagnosis of intermittent faults, signal quality issues, and component timing that a multimeter cannot capture. Lab scope competency is a significant career differentiator.
- Fuel Pressure Gauge and Vacuum Gauge: Simple, affordable, and essential for engine diagnosis. Many driveability complaints trace back to fuel delivery or vacuum issues that are confirmed quickly with these analog tools.
- Infrared Thermometer and Thermal Imager: Used for identifying temperature differentials across catalytic converters, brake components, HVAC systems, and electrical connections. A thermal imager is an advanced tool with a steep price – but an infrared thermometer is inexpensive and useful from day one.
The Bottom Line
Diagnostic skill is the highest-value technical capability a technician can develop. It is also the skill that takes the longest to build – because it requires not just knowledge but judgment, and judgment only comes from experience applied deliberately over time.
Follow the process. Use service information. Test before you replace. Document clearly. Debrief your mistakes. That’s the entire formula. The techs who apply it consistently are the ones shops fight to keep.
Sources & Further Reading
For more information on the topics covered in this article, we recommend the following resources:
- National Institute for Automotive Service Excellence (ASE): ase.com – certification testing covering diagnostic competency across all automotive and diesel systems
- Alldata: alldata.com – professional OEM service information, wiring diagrams, and Technical Service Bulletins used by shops nationwide
- Mitchell 1: mitchell1.com – professional service information platform with diagnostic procedures, labor times, and repair data
- iATN (International Automotive Technicians Network): iatn.net – professional community of diagnostic technicians sharing real-world case studies and diagnostic strategies